• Skip to main content
  • Skip to primary sidebar
  • Skip to footer

That's Some Good Cookin

  • HOME
  • Blog
  • Recipe Index
  • ABOUT
  • CONTACT

Quick and Easy Breadsticks

July 21, 2011 by Terri @ that's some good cookin' 4 Comments

Easy Garlic Bread Sticks

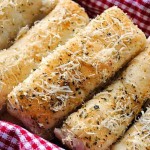
Ready in about an hour, these breadsticks are amazingly easy to make. Your family will love you, but more than that, you’ll love yourself!

Oh goodness. If you want to drive yourself absolutely crazy with delicious breadsticks baking right in your own oven, keep reading. Want to drive someone else crazy? Invite them over for dinner when you make these breadsticks and then don’t let them have any.

Don’t be silly. You can’t eat all of these by yourself, so be a nice person and share them.

I wish that I could claim this recipe as my very own, but Jamie at Jamie Cooks It Up is the proud owner of this one. I….am simply someone who tried the recipe, loved it in every way, and have now blogged about it, and will definitely continue to use it often.

These are easy, easy, easy. I ought to also mention that they can be a tad addictive. They can be made, start to finish, in about an hour. It takes the pizza guy longer than that to deliver a mediocre bread stick product, so make these yourself and scoff at the thought of ever ordering another bread stick (even from that place that offers unlimited bread sticks and salad with your meal).

Oh, and this little post comes with a testimonial that you can believe: Gavin (4 years old with the wisdom of the ages), multiple times, and with great enthusiasm, proclaimed these to be better than Cinnamon Chex. Kade (20 months old) was enamored with picking the crispy cheese off of them. Something for everyone.

Easy Garlic Bread Sticks
Print Recipe

Quick and Easy Bread Sticks

Make these breadsticks in about an hour, start to finish!
Prep Time40 minutes mins
Cook Time20 minutes mins
Total Time1 hour hr
Servings: 36 breadstsicks
Author: Terri @ that's some good cookin'

Ingredients

  • 1½ cups warm water
  • 2 tablespoons sugar
  • 1 tablespoon instant yeast
  • ½ teaspoons salt
  • 3½ - 4 cups flour
  • ¼ cup butter (not margarine)
  • ¾ cup grated Parmesan or mozzarella cheese
  • Johnny's Garlic Seasoning

Instructions

  • Preheat oven to 170-degrees F.
  • Mix the water, sugar and yeast together in the bottom of your mixer bowl. Let it sit for 5 minutes, then add the salt
  • With the mixer running, add the flour, one cup at a time, until it is well incorporated and dough just leaves the sides of the mixing bowl. Be careful not to add too much flour, this is a medium soft dough. Mix on high for 5 minutes. Then, turn off mixer and let the dough rest for 5 minutes.
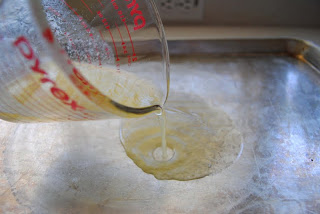
  • Melt the butter and pour half of it into a half sheet pan. Use a pastry brush to paint the butter around the inside of the pan, including the sides.
  • Place the dough in the center of the pan and let it rest for 2 or 3 minutes. This is important because it gives the dough a chance to relax, which makes it much more pliable.
  • With your hands, spread the dough evenly to the edges of the pan.
  • Pour the remaining butter over the top of the dough. Using your hands or a pastry brush, spread the butter evenly over the dough surface. Sprinkle the garlic seasoning over the butter, then sprinkle the Parmesan over the garlic seasoning.
  • With a pizza cutter cut the dough into three rows lengthwise, and then into 12 rows crosswise.
  • Put the pan of dough in the oven for 7-10 minutes to allow the bread sticks to have a quick rise time.
  • Without removing the bread sticks from the oven, turn the oven up to 350 and bake for about 15-20 minutes, or until golden brown.
  • Set aside to rest for 5 minutes. Redefine the cutting lines with the pizza cutter. Use scissors or a sharp paring knife to cut the edges where the pizza cutter cannot reach. Serve immediately.

Notes

A single batch of this dough can be made in a stand mixer. For a double or triple batch of it, make it in a mixer such as a Bosch. Recipe by Jamie @ Jamie Cooks It Up

Put the warm water, yeast, and sugar into a measuring cup or in the bottom of the mixing bowl. I generally use a 2+ cup measuring cup just because I like to watch the yeast to its yeasty thing.

Easy Garlic Bread Sticks//Easy Garlic Bread Sticks
 
 When the yeast has been activated and starts to become foamy, it’s ready for the salt and flour to be added.
Easy Garlic Bread Sticks///Easy Garlic Bread Sticks
/
Measure out the salt and add it to the yeast mixture.
Easy Garlic Bread Sticks
 
 Turn on the mixer to a slow or medium speed and add the flour once cup at a time, allowing the flour to be incorporated into the slurry before adding the next cup of flour. When the dough leaves the side of the bowl, turn the mixer on high (if you have not already had to do so with the increasing weight of the flour.) Mix on high for 5 minutes. Turn off mixer and allow the dough to rest for 5 minutes. I cover the bowl with a damp dish towel to help keep the dough from drying out.
Easy Garlic Bread Sticks
 
 
Easy Garlic Bread Sticks
 
Melt the butter. Pour half of it on the baking pan. Coat the pan with the butter using a pastry brush…or your hand…whichever one suits your fancy.
 
Turn the dough out onto the buttered pan. Let it rest for a few minutes. Resting the dough allows it to relax, making it much easier to work with.
Easy Garlic Bread Sticks
 
With your hands, spread the dough out flat to conform to the shape of the pan. It is best to work from the center out to the edges. The dough may be a bit resistant about staying in the corners. You have some choices to make at this point. You can either ignore the dough’s reticence about the corners or you can stand and continuously push the dough back into the corners until it mostly stays. It all comes down to how OCD  you are. Notice how I am not showing you the corners in these pics…my psychological state is really not open to discussion here.
Easy Garlic Bread Sticks
 
Easy Garlic Bread Sticks
Pour the remaining butter onto the dough and smooth it around on top of the dough with your hands.  Very therapeutic feeling warm butter across dough.
Easy Garlic Bread Sticks
 
Easy Garlic Bread Sticks
 
Easy Garlic Bread Sticks
 
This is a bottle of Johnny’s Garlic Spread Seasoning. I love Johnny’s products and they can be found at many grocery stores in the spice isle along with other similar items. Try Johnny’s seasoning salt.  It is the best! Sprinkle the garlic spread seasoning over the buttered dough. This is a flavor intensive product so don’t over-do it on the seasoning.
Easy Garlic Bread Sticks
 
Easy Garlic Bread Sticks
 
Easy Garlic Bread Sticks
 
Grate some parmesan cheese and scatter it over the dough.
Easy Garlic Bread Sticks
 
Easy Garlic Bread Sticks
 
With a pizza cutter, cut the dough into three sections lengthwise and about 12 sections crosswise. Put the pan of dough into a preheated 170-degree oven for about 7-10 minutes. This will give the dough a chance to rise. Then, without removing the pan from the oven, turn the oven up to 350-degrees F. and bake the bread sticks for 12-20 minutes until light golden brown. Each oven is different so take a look at the bread sticks after 12 minutes and see if they are how you like them.
Easy Garlic Bread Sticks
/
Easy Garlic Bread Sticks
 
Take the bread sticks out of the oven and allow them to cool for about 5 minutes. Then, with the pizza cutter, re-cut the lines.
Easy Garlic Bread Sticks
/
Use a pair of kitchen scissors to cut the edges where the pizza cutter couldn’t reach.
Easy Garlic Bread Sticks
 
 Aren’t these beautiful?
Easy Garlic Bread Sticks


Share this:

  • Pinterest
  • Email
  • Facebook
  • Twitter

Like this:

Like Loading...

Filed Under: Breads/Muffins/Rolls, Ring the Dinner Bell

Previous Post: « Pasta Sauce with Roasted Tomatoes and Caramelized Onions
Next Post: Chicken Alabam »

Reader Interactions

Comments

  1. Rie

    March 31, 2020 at 15:39

    Can’t wait for a free moment to make these!!

    Loading...
    Reply
  2. Rie

    July 1, 2020 at 16:26

    Hello Friend…. I finally have the time (and yeast!) to make the recipe this weekend. I do have a QUESTION though. Why do you proof instant yeast? I thought you can just add instead yeast to your dry ingredients, the water with the eat and proceed. I didn’t think you need to feed instant yeast. I will do whatever you say (LOL) but just curious. Thanks, xoxoxo RIe

    Loading...
    Reply
    • Terri @ that's some good cookin'

      July 4, 2020 at 00:57

      Good point about the yeast. I proof my yeast out of habit because there was a time that I lost a few batches of bread dough in the early years of instant yeast. Consequently, I always proof yeast, even if it is instant and can be added directly to the dough. However, the last time that I made rolls, I took a leap of faith and added the dry yeast to my flour and everything worked out well. I ought to update this recipe, which I will get to doing right after I think about it again. Actually, I need to update all of the recipes. I updated some of them a while back and then my doggie died from cancer and COVID-19 happened and my husband started working from home and my daughter accepted a new job in Washington state and we helped her move and then the whole world imploded and I got distracted.

      Loading...
      Reply
  3. Rie

    July 4, 2020 at 10:01

    Hi Terri,
    So sorry to hear about the passing of you precious pup. They are truly family members and need to be grieved and mourned for. Lost our last dog 2 years ago and our first nine years. They still have their paw prints all over our hearts.
    Thanks for talking the time to respond with all that you have had going on. I appreciate it.
    Stay safe!
    Rie

    Loading...
    Reply

Leave a Reply to Rie Cancel reply

Your email address will not be published. Required fields are marked *

This site uses Akismet to reduce spam. Learn how your comment data is processed.

Primary Sidebar

Hidee Ho, Neighbor

I'm Terri - wife, mother, grandmother, nurse, blogger, former ski bum, lover of pie, family historian, and over-thinker. I created That's Some Good Cookin' because I truly believe that the best made is homemade. Join me for good food and a few belly laughs. Become an email subscriber and be the first on your block to receive my latest posts. (Look down...yep, just below where you're reading right now...see that "Stay Updated" window? It's waiting just for you!) Read More…

Footer

Terri’s Current Favorites

Lentil, Quinoa & Orzo Salad

Lentil, Quinoa, and Orzo Salad

Pork Carnitas

Pork Carnitas

Mediterranean Langostino Pasta - Make tonight's pasta extraordinary with the addition of langostino, sundried tomatoes and Italian herbs.

Mediterranean Langostino Pasta

%d