
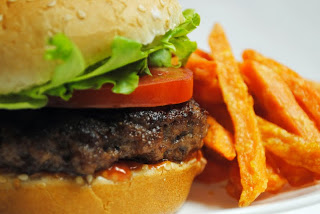
You see that burger? Looks like summertime, doesn’t it? Looks like warm weather and barbeque’s and the Fourth of July. Yesiree, that’s exactly what it looks like.
A lot of us here in northern Utah are wondering if we will ever get to use our grills this year. We are wondering if the Fourth of July will be more like the 25th of December.
The trees and flowers are stoically, and ever-so-slowly, inching their way towards Spring. Brave little troopers. This daffodil in my front yard is wearing some battle scars–wind, snow, and hail are the culprits.


So, while the weather continues to throw it’s temper tantrums, I have decided to take a cue from the trees and flowers and move forward as though we are having warmer weather. I’m just gutsy that way. Gutsy enough to make summertime hamburgers, despite the fact that I had to make them on the stove in my kitchen in my trusty cast iron frying pan.
Which reminds me – if you don’t have a cast iron frying pan yet, go get yourself one of those marvels. People have been cooking in pots and pans made out of cast iron for hundreds of years. Cast iron cookware used to be passed down through families in wills, as in Last Will and Testament. True. I have copies of some old wills from the 1700’s and early 1800’s where a treasured cast iron kettle or frying pan was being bequeathed to a favored daughter. There’s a bit of history for you. I ought to do a post about cast iron. It would be kind of fun.
It’s pretty nervy, I’ll admit, to post a recipe for a basic hamburger, but these burgers are the Mary Poppins of classic burgers (practically perfect in every way). They’re easy, fast, and delicious. And they will make you smile. And will fill your belly with all sorts satisfying goodness.
Cook them in a skillet, outdoors on the grill, or on your George Foreman…whatever way strikes your fancy. Cheese or no cheese; onion or no onion; pickles–perhaps; fancy sauce–don’t do it for the classic; lettuce and tomato–yes, please; mustard–I suppose it’s traditional; ketchup and mayo–yep (some prefer Miracle Whip–to each his own).
The type of ground beef used and the percentage of fat are important to a really great burger. I like ground chuck with an 80/20 lean to fat ratio. Yes, that’s a lot of fat, but the fat is necessary for a juicy, flavorful burger. Save the lean ground beef for other uses; burgers need the fat, so reconcile with that fact and move forward with gladness.
An additional ingredient that my mom taught me to use is bread, rather I ought to say, wet bread. People who have seen me do this wet bread technique look at me as though I have just suggested squirrel guts for a secret ingredient. They change their minds after they taste their first bite of the moist hamburger in which this bread is used. I just smile.

Classic Hamburger
Ingredients
- 1 1/2 pounds 80/20 ground chuck
- 2 slices white bread
- 3/4 teaspoon salt
- 1/2 teaspoon granulated garlic or garlic powder
- 1/2 teaspoon granulated onion or onion powder
- 1/4 teaspoon ground black pepper
Instructions
- Put the ground chuck in a large mixing bowl. Add the salt, garlic, onion, and black pepper. Set aside.
- Wet the bread, then gently gather the wet bread into a ball. Express water from the ball by lightly squeezing it with both hands. Don't squish it. Don't mangle it. Simply keep it in a ball and add gentle pressure to express a little of the water.
- Add the bread to the meat and seasonings. Mix well. I use my hands to thoroughly blend all of the ingredients. The meat mixture will take on a creamy look when the bread is well incorporated.
- Shape into patties. Because of the higher fat content these patties will shrink more than a leaner ground beef, so make them larger than you want your finished product. I got six patties out of the 1 1/2 pounds of ground chuck.
- Cook (fry, grill) until the juices run clear. Because I am a little bit, okay a lot bit, careful about food born pathogens, I cook the beef to a well done stage. This doesn't mean that the burgers have to be dry with no juices left; it simply means that the meat has reached an internal temperature of 160-165 degrees F, which still leaves a lovely, juicy burger.
- Serve with your favorite condiments.
/


 /
/ /
/ /
/
You may also like:

Honey Teriyaki Burger

Tin Foil Dinners

Salisbury Steak
My mouth is watering!
With good reason! These were ridiculous.
Wow–that burger looks great!! I love the wet bread trick! I am going to try this for my husband and boys–they are BIG burger fans and I rarely make them. Thanks for the tips Terri!! All your recipes look so yummy!
Thanks for the compliment, Melanie. I love looking around your blog and check it out pretty much every day. I’m totally jealous that you and your sisters get to work together on such a great blog!
These were just delicious. I had never heard of adding bread like that before – we usually add in bread crumbs. The bread really made the burger moist. I only had martins potato bread and added that.
Also, I have a question…why is it necessary not to squish the bread when extracting the water? I was just wondering because when you mix the bread in with the beef it all gets squished up anyway.
Thank you for a wonderful recipe Terri.
Good question and part of the answer is funny. First, you want the bread nice and moist when you add it to the beef. Second (this is the funny part) the bread will fall apart if you squeeze it too hard. So, in my efforts to keep anyone making this recipe from ending up with the wet bread oozing through their fingers, I didn’t explain myself very well. Making a ball out of the wet bread is the easiest way to transfer it to the bowl without half of it splatting onto the floor or into the sink…ask me how I know.
Yeppers, your wet bread genius idea has been a great discovery for me! I remember the first time I saw you do it and it was like a EUREKA moment! You’re brilliant (that’s what they say in London!) Cheers!
OH MY GOD those chips look AMAZING