

My mother in-law (Mavis) gave me this recipe for No-Knead Dinner Rolls when I first married Honey Buns. They are fast and unbelievably easy. Oh, and soooo delicious. It is a rare occasion for there to be more than two or three left over rolls at the end of a family meal. There is, however, usually some leftover dough which I use to make scones—not the baked kind of scones; the kind of scones that you fry in oil and slather with honey butter and eat with your bare hands and let the honey butter drip down the back of your hand, all the while luxuriating in the crunch of the crispy outside of the warm scone and the doughiness of the soft inside and…
Oh, sorry. I got a little side-tracked.
Here’s the recipe with “how-to” pictures. Don’t let the easiness intimidate you. And don’t argue with me about stirring the dough and NOT kneading it.
Shameful Disclaimer: Please excuse the quality of the photos in this post. I created this post when I was a newbie blogger. I keep telling myself that I will re-shoot the photos, but it is a lengthy process and I just ain’t been in the mood. The tutorial is a good one and I am certain that you will forgive me for not having the pics up to par.
No-Knead Dinner Rolls
Ingredients
- 3 cups warm water, or you can use 2 cups of water and 3 eggs if you want a richer roll
- 2 tablespoons yeast
- 1/2 cup sugar
- 1/2 cup oil
- 2 teaspoons salt
- 6-7 cups flour
- 1/2 cup butter, melted (for dipping dough prior to forming into rolls)
Instructions
- In a large mixing bowl dissolve yeast in warm water with 1/4 teaspoon sugar.
- When the yeast has activated (about 5-10 minutes), add sugar, oil, salt and 6 cups of flour. Stir well with a wooden spoon until all ingredients are well incorporated. If needed, add in remaining flour, about 1/4 cup at a time and stirring with each addition, until dough is sticky, but not gooey. Do not knead the dough; just stir it until the ingredients are incorporated.This is a very soft dough and will be somewhat sticky, not drier like other roll dough that you may be used to using.
- Cover bowl and let dough rise until doubled in bulk, about 1 hour. Punch dough down and let it rest for about 7 minutes.
- While the dough is resting, melt the butter in a small bowl in the microwave. Prepare a baking pan by greasing the pan with a little bit of the melted butter.
- To shape a Parker House style roll, divide the dough in half and roll out one half of the dough on a well floured counter top until about 1/2-inch thick. Using a round biscuit cutter, cut out circles of dough. Stretch the dough just a little lengthwise and dip one half into melted butter. Fold dough over in half and place on the pan. Place the rolls close to each other in rows. Repeat with remaining half of dough. Work the left-over dough from the two dough halves together to finish making your rolls. You should be able to get 32 rolls on a large baking sheet (4 rolls across and 8 rolls down).
- Cover rolls and let rise again until almost doubled in size, 45-60 minutes. Bake at 375º F for 20 minutes or until the rolls are golden brown. Brush hot rolls with additional butter if desired.
Notes
- This dough can be kept in the refrigerator for up to a week and the dough just pulled off as you wish to use it to make cinnamon rolls, pull-aparts, hot rolls, bread sticks, fry bread or "Utah" scones during the week.
- One extra tidbit of information: As the dough sits in the refrigerator, it will become "yeastier". In other words, it will develop a fermented taste. This is normal. It is simply what yeast does as it sits over time. This is the science-in-action behind sour dough starters and Amish Friendship Bread starters.
/


I love to watch yeast do its thing. Keep an eye on it while it is activating because it doesn’t mind rising right out of the cup and spreading itself across the countertop.
/


Add the remaining ingredients…oil, sugar, salt, and flour. Start with 6 cups of flour. After you have stirred the ingredients, you may need to add some more flour. However, this is supposed to be a soft dough; a little sticky, but not gooey. A soft dough helps make a lighter roll.

Now stir! It really doesn’t take much stirring. Honest. Remember to keep the dough somewhat sticky, you do not want to have “smooth and elastic”. If you get it smooth and elastic, then you have done yourself a disservice…and your rolls won’t work well. Again, you are just going to have to trust me on this one.
/


After the dough has risen, punch it down to release the large gas bubbles that have formed during the rising process. Take half of the dough and shape it into ball. Put the ball of dough on a floured countertop to “rest” for a few minutes.

While the dough is resting, melt 1 stick of butter. I melt the butter in a glass bowl in the microwave. One minute on high in my microwave is perfect.


For each roll, take the dough and stretch it into an oval. Don’t stretch it too much because you don’t want to thin out the dough. Just give the dough a bit of a tug to stretch it out of it’s round shape.


Now fold the dough oval in half with the buttered side up. You’ll figure out a way to flip the dough easily with your fingers over your thumbs. The top of the roll should overlap the bottom slightly. This will help to keep the dough from unfolding while it rises and bakes.

Place the rolls on a buttered baking pan. Put them close together; it is okay if they touch, but don’t crowd them. Remember, they need room to rise and will double in size. Repeat the whole process with the other half of the dough (the part that is still in the bowl, remember?)

When you are through cutting out the rolls from both halves of dough, gather the dough ‘scraps’, smoosh them together and form another ball. Roll out and cut out more rolls to fill the remainder of your pan.


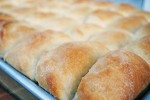
This is how the rolls will look when they are ready to go into the oven. Bake them at 375 degrees for about 20 minutes or until they are golden brown.
 /
/Beautiful. My favorite rolls are the ones on the edges of the pan because they get browner and sometimes, if I am lucky, crispy on the outside edge. Yeah baby. Now get me the butter!


YUM! Love looking at your recipes, thanks for posting them!
You’re welcome, anonymous! Thanks for dropping by.
Hey, I wasn’t in the least bit worried about the quality of the photos. I just wanted to see how you formed the parker house rolls, and the photos were just perfect. I love your recipes, so am always happy to see a new one on TK. Thanks so much.
No, thank YOU anonymous. And thanks also for the nice comment. ~Terri
I made these last night…HUGE hit! And they couldn’t be easier! I gave it five big oven mitts on Tastykitchen. This one’s going in the recipe box. Thanks for sharing.
JCC–Wahoo! These are my family’s #1 favorite roll and I’m so glad that your family likes them, too!
Hi! I am making these rolls for thanksgiving. I am making them ahead. Should I shape them into rolls and then refrigerate? Or when it’s a ball of dough? Thanks!
Refrigerate when it is a ball of dough. This is a very active dough and the rolls will rise all over the place, even under refrigeration, if formed in advance. Since you are making the dough in advance, be sure to use a large bowl and cover it tightly. The dough rises quite a bit and trust me, it will find its way out of the bowl if not covered tightly.
About 30 minutes before you are ready to shape the rolls, take the dough out of the refrigerator and allow it to come to room temperature. The dough is going to be sticky, so sprinkle your counter top with flour, put the dough on the flour and then turn the dough over to flour the opposite side before attempting to roll it out.
Because the dough is going to sit overnight, it may smell “yeastier” than when it was put in the refrigerator. This is not a sign that the dough has gone bad. It is simply the chemistry of yeast. I did have one person on Tasty Kitchen who was very upset about the recipe, stating that after she refrigerated the dough it ‘smelled like beer’. I’m sharing this information with you in an effort of full disclosure. I wouldn’t want you to be disappointed, especially on Thanksgiving.
I have used this recipe hundreds of times and it has been my mother in-law’s go-to recipe for probably 35-40 years. She always made it on Saturday night for Sunday dinner the following afternoon. I have used the dough at all different stages, even when it was 5 days old. It tastes different on day 5 than it does on day 1, but my family and I like it in all of its variations.
I just made these and they are wonderful! Thanks for sharing the recipe! I made it with 4 cups white flour and 2 cups wheat, but I’m going to do another batch with all white. I love it that one pan makes plenty of rolls for a family get together. I’m thinking of adding some grated parmesan to the dough for a little extra flavor.
What other recipes can you use with this dough? Do you have posts on them?
Marla, yay! I’m so glad that the recipe worked well for you. Thanks for letting me know that using part white/part wheat flour works well in this recipe. Grated parmesan sounds delicious.
I don’t have any other posts on here for using this recipe, but I definitely ought to address that idea in a near future post. My family’s favorite thing to do with leftover dough is to cut out biscuit shapes, fry them in oil until golden brown, and then eat them either with honey butter or sprinkled with powdered sugar. I have also made breadsticks using this dough. Simply roll out the dough (to maybe a little less than 1/2″ thickness) and using a pizza cutter, cut the dough into strips. I like to twist the strips (for interest), brush them with melted butter, and bake. If desired, before baking, the bread sticks can be sprinkled with garlic powder, seasoning salt, etc. Another option would be to sprinkle the buttered, unbaked, bread sticks with cinnamon sugar prior to baking. Actually, I guess that the bread sticks could be brushed with melted butter after baking and then sprinkled with cinnamon sugar.
I can see that I am absolutely going to have to do a follow-up post showing other uses for this dough. Thanks for idea!
Oh, one more thing. I forgot to say that the bread sticks need to rise for 20-30 minutes before baking. The fried biscuits (we refer to them as scones although I know that is not the correct terminology) do not need to rise before cooking.
Thanks for the recipe – can we half the recipe? If yes, would I have all the ingredients reduced by half, including the yeast?
Thanks for dropping by and asking a question about these rolls. Yes, halve all of the ingredients, including the yeast. Best wishes in your baking! ~Terri
I know you can’t give exact times as dough rises at different speeds depending on room temp. & other things. But could you please give an average total time – start to finish? Being a family of two now, I would be halving the recipe and using any leftover dough for Indian Fry Bread (what you call scones.) Thanks so much for the recipe. 🙂
Hi, Jacki. I have updated the recipe with prep, cook and total times. Thanks for bringing the issue to my attention. This recipe is from my early days as a food blogger, before I knew more about how to write a recipe. I really ought to go back through all of the recipes from the early days and re-write them–no small task. Best wishes and I hope that this recipe works well for you. Please feel free to ask any questions that you may have. ~Terri
These rolls are amazing. I like a yeast flavor, so days 2-4 are perfect! I’m making these for my family at Christmas.
So glad you like them! I am making them for Christmas as well.
Terri, since I have used this recipe for a couple of years now, I thought it was high-time to thank you. Your recipe makes the most amazing Parker House type rolls I’ve ever found. I make a batch at least two or three times a month, with each batch lasting me almost a week. I especially like leaving them in the fridge for two or three days, letting them develop that amazing “yeasty” taste I love. Easy, no-fail, and always delicious. Thanks so much! Wade
Wade, you are very welcome. I’ll pass your kind words on to my mother in-law since she was the one who originally gave me the recipe.