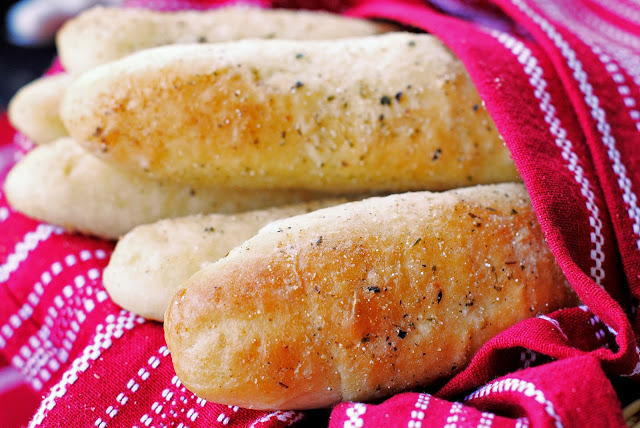
I’m not even going to hold back on my statement about these bread sticks. They rock!
Almost guiltily, my husband looked at me after his first bite and said, “Honey? Umm, these are better than Olive Garden.”
“Of course they are, my wise, thoughtful, angelic Honey Pot”, I said nonchalantly. “Why would I bother with anything less than perfection?”
I didn’t really say that, but it would have been such a great thing to say if I was making a sappy commercial.
I mean, really though, why would I bother making Olive Garden quality bread sticks when I can make better than Olive Garden bread sticks and so can you! Plus, can I let you in on a secret? Olive Garden bread sticks do not taste like they tasted years ago. Something has changed in their recipe and I’m sorry to say that it was not a change for the better.
I’m being rude I suppose. It’s just that I LOVE Olive Garden and to have one of their main food attractions diminish in flavor and quality makes me sad. I keep trying their bread sticks, hoping that they will taste like they used to taste, but alas, they do not. Color me…disappointed.
Now, however, both you and I can make better than Olive Garden bread sticks. They are easy and can be made by hand or with a mixer!
I have a favorite brand of garlic bread topping that I like to use, Johnny’s. Since I’m a worrier by trade, I started thinking about the possibility of no longer being able to get my hands on this product. So, I fiddled around with making my own garlic bread topping. Note to self: Do not play test kitchen with this mix on Sunday prior to going to Church. There is not enough toothpaste or peppermint gum on the planet to hide the fact that you’ve been taste-testing the various recipe combinations.
Yes indeedy, I got so lost in perfecting the recipe that I didn’t even stop to think about the odoriferous garlic breath I was creating. Too late, it suddenly hit me that I was going to stink to high heaven at Church (no disrespectful pun intended). Just to make sure that I was right about the garlic breath thing, I asked John to confirm, or hopefully deny, my fears, so I stood a couple of feet away from him and blew lightly. After I resuscitated him, he said that if I ever did that to him again he would pack my clothes and I could pick them up on the curb 20 blocks away downwind from him.
Well. So. I went to Church anyway, but with a sign around my neck, “Hearken all ye saints! Beware, for I have eaten garlic on this very day and I stinketh.”
Guess what? This stuff rocks. We’re talking serious rocking. I am so stinking proud! (Pun intended)
Tomorrow there will be a tutorial using this same recipe to make hamburger buns. EXCITING!!!!
Cook’s Notes:
- As I frequently like to remind those who are just learning to work with yeast dough, watch the amount flour that is added to the dough. It is easy to add too much flour, making a heavy end product. While fresh out of the oven, the warm bread will taste terrific, but as the bread product cools, it becomes heavy and dry.
- Proper kneading is key to great texture. Kneading develops the gluten, which is the ‘secret ingredient’ in a soft, yet slightly chewy texture.
- The Yeast. Put the yeast in warm water or milk, about 110-degrees F. If the water or milk is too hot, it will kill the yeast. If the liquid is too cold, the yeast will not activate. Inactive yeast will just sit there, doing nothing, and your bread will not rise. If you’re into flat, brickbat bread that tastes like yeast, then by all means mess up the yeast. Sugar, just a pinch, is needed to help activate the yeast; it’s what the yeast eats to expand (don’t we all!) With a little practice, proofing yeast will become second nature.
Perfect Bread Sticks with Buttery Garlic Topping
Ingredients
For the Dough:
- 1/4 cup warm water
- 1 tablespoon instant yeast (I used SAF instant yeast)
- pinch of sugar
- 3/4 cup warm milk, (warm in microwave or in pot on stove--just warm, not hot)
- 2 tablespoons oil
- 1 egg
- 2 tablespoons white granulated sugar
- 1 teaspoon salt
- 3-3 1/2 cups white flour
For the garlic bread topping:
- 3 tablespoons dry, grated Parmesan cheese (yes, like the kind in the green bottle)
- 2 tablespoons dry granulated garlic
- 2 teaspoons dry parsley flakes, crushed
- 1 teaspoon sea salt
- 1/2 teaspoon dry basil flakes, crushed
- 1/2 teaspoon onion powder
- 1/4 teaspoon dry oregano flakes, crushed
- 6 tablespoons butter
Instructions
For the dough:
- Pour yeast in 1/4 cup warm water with a pinch of sugar. Stir well. Allow yeast to proof until bubbly and active, about 5-10 minutes.
- In the bowl of a stand mixer add the proofed yeast, warm milk, oil, eggs, sugar, salt and 1 1/2 cups of the flour.
- With the paddle attachment, on low speed mix ingredients for five minutes. The batter should be smooth.
- Change to the dough hook and add 1 cup of flour. Mix on low speed until flour is incorporated. Add only enough remaining flour, a little at a time, until a medium soft dough forms. The dough should be tacky, but not sticky.
- Continue to knead the dough in the mixer or by hand on a lightly floured counter-top until smooth and elastic. There will be very small bubbles just under the surface of the dough when it has been kneaded enough.
- Gather dough into a ball. Place in a greased bowl, turn dough over once so that the surface is lightly coated with oil. Cover bowl with a slightly damp kitchen towel and let rest for 30 minutes.
- Punch dough down and work out the large yeasty bubbles. Divide into 16 equal sized pieces. The use of a kitchen scale will help to make the pieces equal in weight, if you care about that sort of thing ;).
- Working each piece of dough against the counter-top, form 16 ropes, about 6-inches long.
- Using two, parchment lined or well greased baking sheets, place 8 ropes on each sheet. Cover with damp kitchen towel and allow to rise in a warm place for 30 minutes.
- Bake at 375 degrees for 15-20 minutes until golden brown. Remove from oven and brush with Garlic Bread Topping.
For the garlic bread topping:
- In a small mixing bowl, mix together all of the dry ingredients. Set aside. Note: The ingredients can also be placed in a jar and shaken. Only 1 tablespoon of this mix will be used in this recipe. The remaining mix can easily be stored in the jar in the refrigerator.
- Melt butter in a small bowl in microwave. Stir in 1 tablespoon of the garlic bread topping into the melted butter. Brush each hot breadstick with a little over 1 teaspoon of the mixture. Serve.
Notes
- When working with yeast dough, watch the amount flour that is added to the dough. It is easy to add too much flour, making a heavy end product. Fresh out of the oven, the warm bread will taste terrific, but as the bread product cools, it becomes heavy and dry.
- Proper kneading is key to great texture. Kneading develops the gluten, which is the 'secret ingredient' in a soft, yet slightly chewy texture.
- The Yeast. Put the yeast in warm water or milk, about 110-degrees F. If the water or milk is too hot, it will kill the yeast. If the liquid is too cold, the yeast will not activate. Inactive yeast will just sit there, doing nothing, and your bread will not rise. If you're into flat, brickbat bread that tastes like yeast, then by all means mess up the yeast. Sugar, just a pinch, is needed to help activate the yeast; it's what the yeast eats to expand (don't we all!) With a little practice, proofing yeast will become second nature.

I go to the Olive Garden for the breadsticks. Period. Most times I just eat the breadsticks and just bring my “meal” home.
SO have to try these to see how they measure up!
Thank you for sharing the recipe!
I hope they turn out well for you. I’m glad that Olive Garden is still making good breadsticks in your neck of the woods!
I agree with you assessment on OG’s breads ticks….they are more dense than they used to be. They are great for dipping into their Creamy Chicken Gnocchi soup, though!
Your bread sticks look divine. I’ll take a dozen to go!
Funny about dipping OG’s breadsticks. I was just thinking the same thing a couple of nights ago.
As for the dozen breadsticks, okay, no problem. Since there are 16 in a batch, I’ll give 12 to you and that will leave four for me!
I have sever weakness with Bread Sticks…..these. look. amazing! I’ll just have these for dinner. Thanks for sharing, Terri.
I have a severe weakness for ANYTHING bread! If I ever develop a gluten allergy, I’m sunk.
I think Olive Garden breadsticks are terrible! They always look so much better than they actually taste. These look awesome, and it sounds like they taste great too. I love making bread and can’t wait to try these!
Emily, thank you! If you try the recipe, let me know how it turns out for you.
mmmm….I can’t wait to try these!!!
Andrea, I took a look at your menu line-ups and was wondering if I could just come to your house for dinner?!
Yum!! I’ve gotta try these.
And I think I need to start calling my husband “honey pot” too–that cracked me up. =)
LOL. Let me know how that “honey pot” thing works out for you!
Totally amazing! I bet these do rock. High praises from your husband too. Good one!
Thanks, Tricia! As for my husband, bless his heart he has always been a good sport about my cooking…except when I went through a serious hot pepper phase a few years ago. I couldn’t help myself; I was putting hot peppers in almost everything. Finally John had to ask me to give him a break for a while. I think that hot red pepper flakes in his spaghetti was the straw the broke the camels back.
You don’t put them back into the oven after putting the topping on? Pardon me if I sound clueless but I am the maker of brickbat bread. By the way I don’t think their breadstcks are that great either but Macaroni Grill has some rockin’ bread.
Nope. Cook them, then brush them with the garlic butter spread. And you don’t sound clueless. Thanks for asking the question because I could have just as easily written the directions wrong. As for the brickbat bread, LOL, just use less flour. I made plenty of brickbats when I was learning to make bread. In an effort to lighten up on the flour, I went too far in the other direction and didn’t add enough flour. The bread tasted good, but it didn’t have enough body to rise well. Finally one day I had an epiphany and got it right. I have a tutorial on making 100% whole wheat bread (http://www.tsgcookin.com/2012/01/100-whole-wheat-bread.html) which may help with making yeast bread and yeast bread products. By the way, do you make bread by hand or with a mixer such as a Kitchenaid?
oh, and the baby and I definitely need lots of these.
You, the baby, and the baby’s Mom-mom need lots of these.
Confused about amount of butter to breadstick recipe. Could not find ratios. Did I miss something?
If you are referring to how much of the garlic/butter topping to use on the breadsticks, it comes out to be about a little over 1 teaspoon per breadstick. The math is approximately 1 1/3 teaspoons per breadstick. I have reworked the recipe a little in order to accommodate the answer to your question.