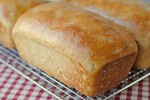
100% Whole Wheat Bread
Made from 100% hard white winter wheat, this bread is as tender as can be. Forget what you know about the heavy, dry whole wheat breads of your past. This bread marks the beginning of a new day. The white winter wheat has a lighter flavor than red winter wheat and makes a wonderful loaf of bread.
Servings: 4 loaves
Ingredients
Please note: This recipe is designed for a large capacity mixer such as Bosch home mixer. If you are using a stand mixer, such as a Kitchenaid, please halve the recipe.
- 4 cups warm water, divided
- 3 tablespoons instant yeast (I like SAF brand)
- pinch of sugar
- 2/3 cup honey
- 2-4 tablespoons oil (I use 4 tablspoons)
- 2 tablespoons salt
- 2/3 cup non-instant powdered milk
- 3-4 tablespoons dough enhancer (optional)
- 1/4 cup vital wheat gluten
- 8-10 cups white winter whole wheat flour
Instructions
- Stir yeast into 1 cup of warm water with a pinch of sugar. Allow yeast to activate. Watch carefully because the yeast can get very active very quickly.
- While the yeast is activating, pour the remaining 3 cups of warm water in the mixing bowl of your mixer. Add the honey, oil, salt and the activated yeast.
- Sprinkle 5 cups of the whole wheat flour over the liquid ingredients. Sprinkle the powdered milk, dough enhancer (if using), and vital wheat gluten over the flour.
- Put the dough hook in place and toggle the control of the mixer a few times to mix the ingredients. Turn mixer on to medium power and allow the machine to work the dough for about 7-10 minutes.
- After the dough looks smooth and the ingredients are well incorporated, add cup #6 of flour. Allow the mixer to incorporate the flour into the dough, then add cup #7 of flour, again allowing the mixer to incorporate the flour.
- The dough will start getting thicker and heavier, add #8 cup of flour 1/2 cup at a time and allow mixer to incorporate the flour. The dough will be much heavier and will require a higher setting on your mixer.
- Cups #9 and #10 need to be added in half cups also. However, probably somewhere between cups 9 and 10 you will notice that the dough is no longer clinging to the edges of the bowl. When you see this happen, stop adding flour to the dough. Put the lid on the bowl and allow the mixer to continue to knead the dough for another 10 minutes.
- After ten minutes, check the dough. It should look smooth and elastic. It will be tacky, but it should not be sticky. There's a difference. Sticky dough clings to your fingers indicating that it is too wet and may need a little bit more flour. A standard for telling if the dough has enough flour in it is to take two floured fingers and stick them down into the dough. If your fingers come out clean with no dough sticking to them, then your dough does not need any more flour.
- A smooth elastic dough will have tiny air bubbles just under the surface. Additionally, if you try to gently pull a small pinch of dough from the main body of dough it will stretch away from the dough. If it snaps or tears away, your dough requires more kneading.
- Once the dough is ready, lightly oil your hands and the work surface. Turn the dough out onto the oiled work surface and shape into a ball. Turn the ball of dough over and then over again to pick up a very light coating of oil.
- Cut the ball of dough into fourths. Try to make them as evenly weighted as possible. I use a kitchen scale for this task. Gather each fourth into a ball and allow to sit on counter while you prep the baking pans.
- Preheat the oven between 150-170 degrees F. Spray each bread pan (I use an 8-inch bread pan) with cooking spray. Take a paper towel and use it to wipe the cooking spray evenly around the interior of each pan.
- Knead each dough ball a few times to work out gas bubbles from the yeast. Form each dough ball into a loaf shape and transfer them to the bread pans.
- Turn off the oven and place the pans inside the oven for the dough to rise. Using a damp, well wrung out kitchen towel, place the towel over the dough while it rises. This will keep the dough from drying out.
- Once the dough has doubled in bulk and has risen about 1 1/2-inches above the top of the pan, turn the oven on to 350-degrees. Yes, you should leave the bread in the oven during the heating up process, this will be a part of the cooking time. The bread should be ready in about 30 minutes, maybe even sooner. Check on it after 20 minutes to see how things are progressing. The bread is ready when it turns golden brown.
- Remove the bread from the oven, take out of the pans and place on a wire rack. If desired, the tops of the bread can be buttered at this time. Additionally, I have a trick that I like to use to help the crusts stay soft while the bread is cooling. I take the same damp towel that I used to cover the bread when it was rising and use it to cover the bread while it is cooling. The moisture from the towel and the heat from the bread help to make a great environment for having soft bread crusts.
- Place the bread in plastic bags as soon as it is cool. Bread that is not going to be used within a couple of days can be frozen for future use.
Notes
This recipe is designed to be made in high capacity mixer such as a Bosch. If using a stand mixer such as a Kitchenaid, please halve the ingredients stated in the recipe.
Recipe by Terri @ that's some good cookin'